Beer Roundup #7: Three Midwest English Barleywines

Food and Drink, Health

Whole Hog BW

To Buy or Not to Buy?
1 = horrible
2 = bad
3 = average
3.5 = good (many better beers out there; won’t buy this again)
4 = very good
4.5 = great
5 = rare best 

A Note on the Style:  English Barleywine

I prefer the malty “English” style barleywine over the hoppy “American” style.  All barleywines have a stiff malt backbone and generous sweetness, but the hop-forward American-style is often so bitter as to be indistinguishable from a high-alcohol double IPA.  Don’t get me wrong, some of my best friends are double IPA’s; I love me a double IPA when it’s got intense sweetness to offset the high IBU, like Bell’s Hopslam, Dogfish Head 120 Minute, or Founders Devil Dancer.

Despite my preference for the maltier English barleywine, it’s curious that I’ve found way more good American barley wines than English ones.  

How to explain this?  Is the English style BW less common in the US?  Not really.  Nearly every brewery that produces American barleywines also produces English ones.  The more likely explanation:  brewing a good English barleywine is more of a challenge because it doesn’t have the pronounced hops to balance the jacked-up sweetness.  Hence, many are sickeningly sweet, like Anchor Old Foghorn or Weyerbacher Blithering Idiot.

But all three specimens below are really good.

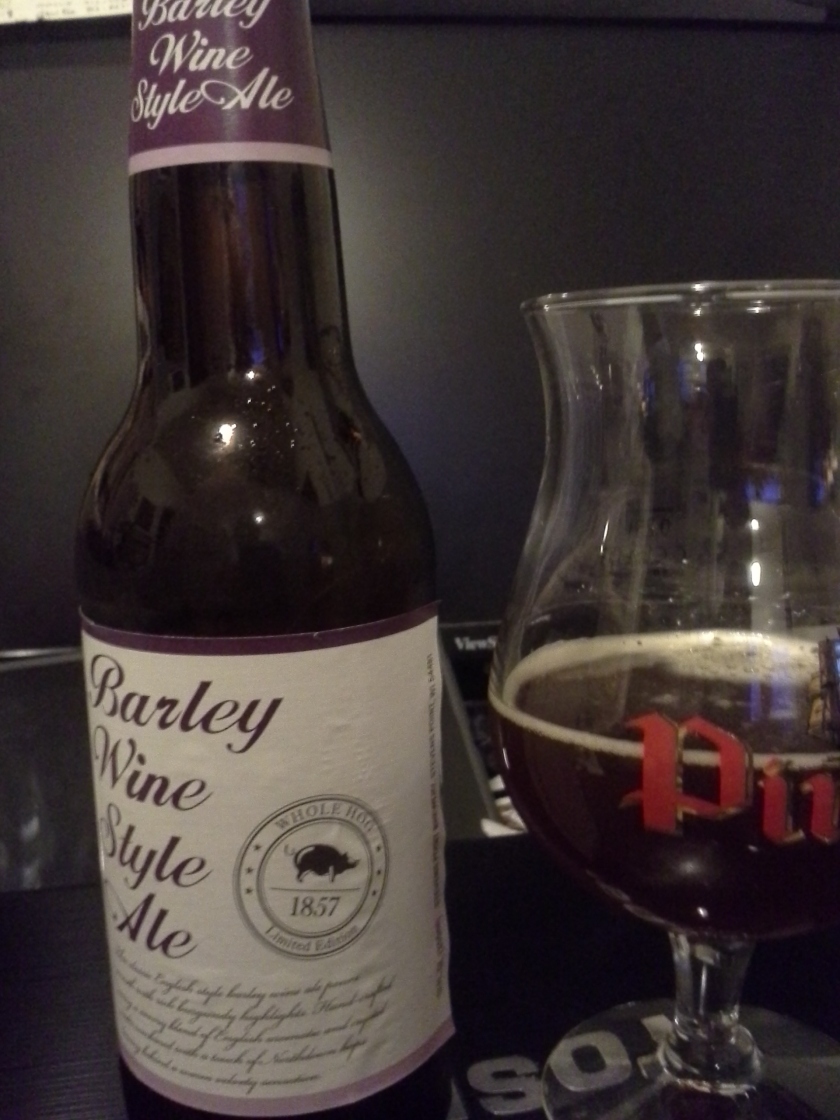
Stevens Point Barley Wine Style Ale (Whole Hog Series), Stevens Point Brewery

Rating:  4.44 / 5

12 oz. bottle (4-pk)  10.2% abv, 73 IBU.

From a very reasonably priced 4-pack ($7), the first sip has me totally psyched.

It’s not a great looking pour into a tulip glass, with barely a half-finger of white head atop the opaque, red-tinged, brown murk. Sticky lacing, with legs.

Very little in the aroma, probably just too cold. But bready, mildly floral, and of course malty in the nose, plus a grape-like, mildly acid wine character. Even after it warms, the nose remains reserved.

But in the mouth, now this is a provocative surprise. Stevens Point Brewery, for those of you not from Wisconsin, is an old-time adjunct-lager outfit, one of the oldest breweries in the US. My Midwest beer friends rarely say anything nice about SPB, so I wasn’t expecting a lot from this brew. But this is right up my alley. It’s a complex sweetness, like that of my two favorite English BW’s,  JW Lees Harvest Ale and Midnight Sun Arctic Devil. The grainy biscuit flavor is what backstops the sugar-sweetness, not any bitterness. Some will call this cloying. I love it. The sweetness rounds out with an estery, mossy oak. The butter/caramel is of the burnt variety. There’s milk and coconut, too.

The mild to moderate carbonation is a welcome cleanser and leavener of the oily-sticky feel.

I’ve gone back to Riley’s Wines and snatched up the last two 4-packs. One goes in the cellar, the other down my gullet!

Schell’s Barley Wine (Stag Series), August Schell Brewing

Rating:  4.46/5

On tap,  9.5% abv, 80 IBU.

I wasn’t expecting a whole lot, thinking of Schell as merely an adjunct-lager outfit. What an awesome surprise.

On tap at Mason Lounge (Madison).  In a snifter, a handsome pour, a clear coppery amber with a finger of white head and good retention and lacing.

The aroma is a bit reserved.  There’s a diacytel caramel, dried fruit, piney hops, and a bit of sharp ethanol.

Flavor in the mouth offers sweet caramel, stone fruit, a bit of citrus, and a floral hop bitterness on the back end.  Finishes sweet, with a hint of grassy hops.  Alcohol is hardly there.

Upland Winter Warmer, Upland Brewing

Rating:  4.05 / 5

On tap,  8.5% abv, 47 IBU.

Pours a hazy, ruddy copper, topped by a fluffy, two-finger head.

A seriously complex aroma, the sweet swirls with the hops.  The hops come as white grapefruit and a bit of must.  The lovely roasted caramel struggles to dominate and ultimately does.

In the mouth the malt/hop tension from the aroma comes down solidly on the side of the malt.  Simple syrup on the front end, sweet butter and bread in the middle, plus fig and cinnamon-raisin ice cream on the back of the tongue. Goes down with just a rumor of bitter hops.  

Feels like a much bigger beer than it is, chewy, even.

Not nearly as good as the other two in this review, but it gets points for availability, as it’s pretty common to find on tap in Midwest bars in the colder months.

How to Create Pre-Press PDF Files on a Budget

Entrepreneurship, Media
bus-card Adler GRACoL 2006

Need to order a commercial print job from an online printer, but don’t have Adobe Illustrator ($560)?  That’s my situation.  I’ve laid out a nice business card in PowerPoint (above), including the logo I also designed in PowerPoint.  But Powerpoint does not produce vector graphics.   Printers need vector graphics.  They also recommend submitting PDFs that have been “pre-flighted” using certain Adobe Acrobat presets, such as PDF/X-1a.

Huh?

That’s what I said.  What a bear it was to research this.  And for an additional challenge, I wanted to see if I could accomplish all this on a budget.  I assumed I could find some vector-graphics freeware with which to reproduce my designs.  But the question remained:  how to  save the graphics file in the “pre-flighted” PDF  format that online printers specify?

(In case you’re considering skipping the preflighting step, know that preflighting helps avoid printing glitches such as font substitutions and color alterations.)

Turns out, the key to all this is Adobe Acrobat.

Some of this terminology rang a bell, as I used to  own the Adobe Creative Suite (ACS; back then, $1500) when I ran my photo equipment rentals business.  ACS includes all the programs that produce file formats press printers require, such as .ID (InDesign), .EPS (Photoshop), .AI (Illustrator), and of course .PDF (Acrobat).  I needed all four of them to design marketing materials for that business.  But that was four years ago.  For the past four years I’ve been running my healthcare business, with no need for ACS, at all.  Now that I’m starting up my freelance commercial writing business, I’ve been crossing my fingers that I won’t need to spend $1000+ on design software.

The bottom line is, yes, one can create vector graphics using freeware/shareware (I used Inkscape to recreate my PowerPoint designs).  But for press printing, you need to create properly preflighted PDF’s.  For that, you must have Adobe Acrobat (price varies depending on version and how purchased, $100 – $429).

I verified this by downloading the free trial of Acrobat 11.  With Acrobat installed, the Acrobat Virtual Printer will appear in your list of devices and printers.  (This is in Windows, obviously.)  You simply design your graphics in your vector software, then follow these steps to preflight your PDF:

1) “Print” your file (That’s right, “print” not “save”!)
2) In the print dialog, select Adobe PDF as the “printer.”
3) Click preferences (or printer properties).
4) In Preferences, the “Default Settings” area offers a drop-down menu of PDF format presets.  For business card printing, Moo.com specifies the preset PDF/X-1a:2001.  For printing a brochure, Vistaprint.com requires PDF/a-1b:2005 (CMYK).
5) Click okay to get out of preferences.
6) Click print.  You’re done.

Now you have your vector-based,  properly pre-flighted  PDF to upload to your online printer.

Layering For Cold Weather: Technical Clothing Systems

Health

layers vert

Body moisture:  it’s your worst enemy when dressing for winter cold. You can be wind-proofed and layered to excess. But if your layers aren’t venting that moisture, the minute your body stops radiating heat, the moisture trapped in your clothing will chill you like a Perdue chicken.

My first winter riding around Madison, I used to either underdress and regret having ever left the house, or I’d over dress, get damp with perspiration, and experience bone-chilling, near-hypothermic misery. Now, after three winters in Madison, I’ve got my layering systems down to a science. I’ve kept notes in increments of 1° or 2°F, from 40°  down to -1° F, both for cycling and walking.  (See below.)

I’ve also filled out my wardrobe of base layers, mid-layers, and technical garments. I prefer Patagonia’s synthetic products. They insulate and vent moisture as well as anything out there.  As a bonus, many of their products are made from recycled plastic bottles.

Just a few things to emphasize before presenting my layering systems.

I pay little attention to my legs. While I do wear a wool insulating layer under my jeans or cords, I leave my legs exposed enough to prevent them from perspiring.  Why?  Because I don’t own any high quality pants that are BOTH windproof AND breathable. Wearing lesser quality windproof pants, my legs get sweaty and damp–the last thing I want when it’s cold. Pants made from Gore-Tex Pro are very expensive. I do own a Gore-Tex Pro jacket ($600), as venting the body core and arms is much more important than the legs. Plus, I bike 95% of my trips around town (no car!), and on my bike my legs pretty much take care of themselves in the warmth department.

However, crotch warmth needs to be accounted for. (Duh!) In conditions of bitter cold (5° F, or lower), I’ll stuff a pair of glove liners down my crotch, and we’re good!

The head is easy. Above 20° F, I wear my aero-helmet with a headband and cycling glasses. Below 20° F, I stay warm in a snowboard helmet. I switch to ski goggles below 12° F  or when it’s windy. The key to snow-helmet comfort is a venting system, one which can be opened or closed on-the-fly. The head generates serious BTUs of heat, so when the air is in the upper-teens, or when pedaling hard, opening the vents keeps one from overheating.

One last thing to note. I avoid windproof insulation under my hardshell. Windproof fleece, such as Patagonia R4 or soft shells with a Gore-Tex layer, work really well as outerwear; they’re my go-to outer layers in milder weather (>30° F). But when worn as an insulating layer, they don’t breathe well.  The consequence:  trapped moisture close to the body.

Below, I’ve condensed my notes (layers for cycling), in increments of approximately 5°. The notes specify weather conditions, time of day, and the success/failure of the layers listed. What’s not specified is the type of cycling: running errands around town, i.e., bicycle trips of 15 to 25 minutes.

Message me or leave a comment if you want the full version (or if you’d like my notes for walking/hiking, instead).

Abbreviations

“Cap” = Capilene (Patagonia)
“Cap 3 crew” = long sleeve crew-neck
“Alpine Jacket” = Patagonia Super Alpine Jacket
“Gore Softshell” = Gore Bike Windproof Softshell
“Hi-loft” = either Patagonia R3 jacket or North Face Radium jacket

35-deg, 11pm, 8mph wind
— perfectly layered, home from High Noon Saloon
Cap1 stretch SS
Cap1 stretch LS
wool LS crew
Cap4 Full Zip
Gore Bike softshell
Capilene scarf, took this off 1/2-way home
wool leggings + jeans
glacier gloves w/ med. liners
Keen hiking boots, Smartwool socks

29 – 30 deg, 12 pm, 9 mph wind
— a bit over-dressed to Co-op; the backpack added warmth
Note: started out the ride with good warmth built up
lighter wool leggings + cords
Capilene 2 LS (this should’ve been a Cap 1, and the Cap 4 could’ve
Cap 4 1/4-zip been Cap 3)
Alpine jacket (possibly could’ve been softshell)
med-weight balaclava (allowed you to leave jacket 1/2-zipped)
lobster gloves + best liners
Keen hiking boots, wool socks
aero helmet + headband, glasses
backpack

30 – 26 deg, 7 – 8 pm, 13 mph wind
— ears/jaws got cold on way home, to Co-op
Note: started out the ride with good warmth built up
lighter wool leggings + cords
Two-layer insulation
Capilene 1 SS (torso was perfect)
Cap 4 1/4-zip
Gore softshell
(would’ve been nice to have mid-weight balaclava for ride home at 26 deg)
lobster gloves + best liners
Keen hiking boots, wool socks
aero helmet + light-weight headband, glasses
backpack

25 deg, 5pm, 5 mph wind, 96% hum.
— just right to State Street, then to Co-op
— was a bit chilly when you had your Cap 4 part-way unzipped
lighter wool leggings + cords
cotton TCap 4 full-zip
Alpine Jacket
lobster gloves + best liners
Keen hiking boots, wool socks
aero helmet, headband
glasses
backpack

22 – 19 deg @ 3 – 5 pm, 13 mph wind
— to State St. (overheated on the way out!! Just right on way home.)
wool leggings + jeans
cotton SS
Smartwool top
North Face Hi-loft fleece
Alpine jacket
lobster gloves, windproof cyc. gloves
wool socks
Keen hiking boots
aero helmet w/ headband
Campy balaclava

17 – 20 deg, 7 – 8 pm, 14 mph wind
— to Co-op (maybe also to Trader Joe’s)
wool leggings + cords
Silk weight Cap SS
Cap2 crew [should’ve deleted this]
Cap4 Full Zip
Alpine hardshell
lobster gloves w/ liners (hands totally fine!)
snowboard helmet (Note: no headband — just tightened chin strap)
Keen hiking boots, Smartwool socks [toes a bit cold when riding hard]
(carried in bag: Capilene scarf, 2nd pr. glove liners, balaclava)

30 – 16 deg, 5 – 8 pm, 9 mph wind
— to Mason Lounge
Note:
lighter wool leggings + cords
Cap 1 SS
Cap 2 1/4-zip[carried Cap 4 full-zip for ride home]
Alpine jacket
med-weight balaclava
lobster gloves + best liners
Keen hiking boots, wool socks, light wool socks
snowboard helmet + glasses

14 deg, 6 pm, 9 mph wind
— to State St. then to Absolutely Art
— torso was too warm; removing the Cap 2 crew was good;
wool leggings + cords
Cap 1 stretch SS (this should’ve been LS, and no Cap 2 layer)
Cap 2 crew [took this off!!]
Cap 4 Full Zip
Alpine hardshell
ski gloves w/ windproof cyc. gloves + liners (hands good until very end)
snowboard helmet
Campy balaclava
Keen hiking boots, Smartwool socks + wool footies
— (feet good until way home from Jenifer St. Mkt.)
(carried in bag: Capilene scarf, 2nd pr. glove liners)

14 – 11 deg, 2 – 4 pm, 4 mph wind
— to Manona Terrace then to Jennifer St. Mkt.
— torso a bit too warm to Manona Terrace; legs/feet/hands perfect
— hands & feet freezing on way home from Jenifer St. Mkt.(probably b/c boots & gloves were a bit damp inside
— should’ve taken gloves off when browsing in stores)
wool leggings + cords
Cap 1 stretch SS
Cap 3 crew
Cap 4 Full Zip
Alpine hardshell
lobster gloves w/ windproof cyc. gloves (should’ve added liners later) snowboard helmet
Keen hiking boots, wool-blend socks (that’s all you had clean)
(carried in bag: Capilene scarf, 2nd pr. glove liners)

10 – 9 deg., 12-1p, 9 mph wind
— too warm!
lighter wool leggings + jeans
Cap 1 stretch SS
Cap 3 crew [had to remove this; should’ve been Cap 1 LS, could’ve rolled sleeves]
Cap 4 Full Zip
Alpine Jacket
heavier balaclava (Gore)
lobster gloves w/ best liners & light liners
Keen insulated boots, wool socks
snowboard helmet
Anon goggles
backpack

6 deg., 3p, 7 mph wind
— just right!
— to Co-op
Cap 1 stretch SS
Cap 2 quarter-zip
Hi-loft Full Zip (North Face)
Alpine Jacket
heavier balaclava (Gore)
lobster gloves w/ best liners and windproof cyc. gloves
Keen insulated boots, wool socks
snowboard helmet
Anon goggles
backpack

5 deg., 7p, 5 mph wind
— over-warm (had excess body-warmth built up + backpack, espec. on way home when backpack was heavy)
— to Co-op
>>>Next time, whenever you’ve got excess body-warmth built up, downgrade the Hi-loft layer to Cap 4
wool leggings + cords
silkweight Cap SS [could’ve deleted this b/c of the backpack]
Cap 3 quarter-zip
Hi-loft Full Zip (North Face) [Or, this could’ve been Cap 4
Alpine Jacket
— unzipped 1/4
— body a little too warm b/c of the backpack
heavier balaclava (Gore)
ski gloves w/ best liners and light liners
— hands were fine
Keen hiking boots, wool socks, lightweight wool socks
— feet perfectly fine
snowboard helmet (no headband)
Anon goggles
backpack

15 – 4 deg., 5p – 11p, 5 mph wind
— just right
— to Square to get bus to Greg’s; ride home from Greg’s
two silkweight Cap SS
Cap 4 full-zip
Hi-loft Full Zip (North Face)
Alpine Jacket
[most everything was comfortable, except my crotch!! Nearly frost bit. Should’ve stuffed lightweight glove liners down there.]
heavier balaclava (Gore)
lobster gloves w/ best liners and windproof cyc. gloves
— hands were fine (surprisingly! You were riding pretty hard the whole way home)
Keen insulated boots, heaviest wool socks
— feet perfectly fine
snowboard helmet (no headband)
Anon goggles
backpack

1 – 4 deg., 1 – 2p, 13 mph wind
— just right to doctors appt.
Cap 1 SSCap 1 LS (a bit too warm; rolled up sleeves on way home and was perfect)
Cap 4 full-zip
Hi-loft Full Zip (North Face)
Alpine Jacketcrotch: glove liners!!
heavier balaclava (Gore)
lobster gloves w/ best liners and windproof cyc. gloves
— hands were fine!
Keen insulated boots, wool socks
— feet perfectly fine
snowboard helmet
Anon goggles
backpack

-1 deg., 7p, 12 mph wind
— to Old Fashioned
lighter wool leggings + cords
Cap 1 stretch SS
Cap 3 1/4 zip
Hi-loft Full Zip (North Face)
Alpine Jacket
heavier balaclava (Gore)
lobster gloves w/ two pr. liners
Keen insulated boots, heavy duty wool socks
snowboard helmet (no headband)
Anon goggles
Cheesecloth? We Don’t Need No Stinkin’ Cheesecloth (To Drain Yogurt)

Food and Drink, Health
Coffee Maker yogurt

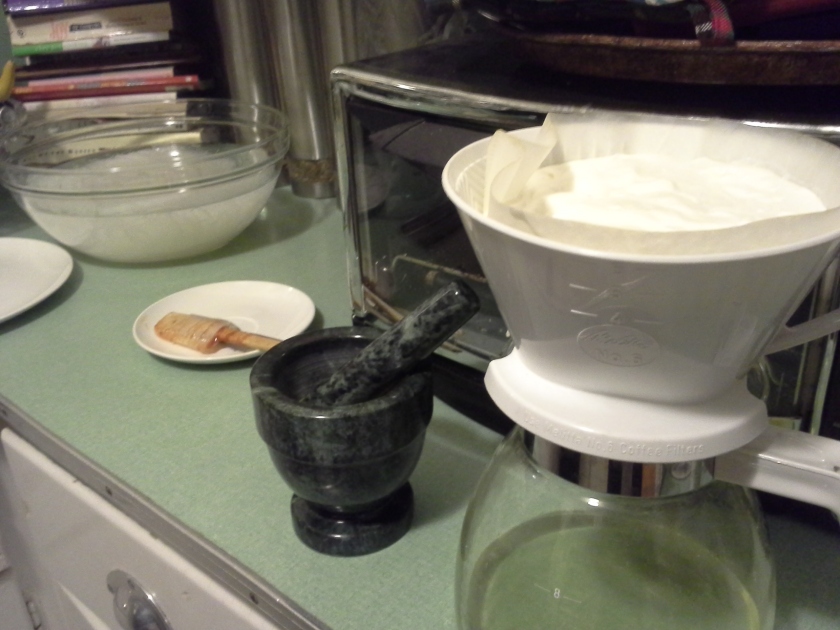
Coffee maker: the better yogurt strainer

The Better Way to Drain Yogurt

In the past when a recipe has called for strained yogurt, my wife and I have always gone with the conventional method, rigging up some version of the mouse-trap variety involving cheesecloth and gravity.  Hanging the yogurt-filled cheesecloth from a banana hook and draining the liquid into a bowl seems to perform well.  But it sure is a pain to set up.  The most commonly recommended method, fitting the cheesecloth inside a colander, simply doesn’t drain well; the larger surface area disperses the force of gravity, and the yogurt drains at a snail’s pace.

It finally occurred to us to try a Melitta coffee maker.  It sets up in a New York minute.  It drains the yogurt faster.  And it streamlines the task on the back end, as well:  after the yogurt fully drains, just tip the strained yogurt out of the filter, and finally squeeze what yogurt has stuck to the paper — like squeezing cake frosting from a pastry bag.  With cheesecloth, you’re left with a gooey mess that requires a spatula to salvage what you can, leaving wasted yogurt smeared in the woven fabric.

The finished product (drained yogurt)

The finished product (drained yogurt)

My Rental Studio Business: Big Multiday Photo Shoots

Entrepreneurship, Media
Magazine cover shot in my rental studio business

Magazine cover shot in my rental studio business

My Rental Studio Business:  Big Multiday Photo Shoots

Weddings in Houston, the city’s premier wedding vendor resource, shot many of its covers at my photography rental studio, Silver Street Studio.  Editor and publisher Radhika Day put together a crew that fired on all cylinders over the three-day shoot.  Crack stylist Summar Salah plied her stagecraft on three different glittery sets and twelve wedding gown wardrobes.  Hair and makeup by The Perfect Face transformed the models into showstopping brides.  And photographer Larry Fagala captured all the drama with technical expertise.

20060919_0010

One of three sets during the three-day shoot